Ukulele Finger Exercises!
Are your fingers hurting? It’s a nightmare for beginners just starting to play the ukulele. Don’t despair and give up on your ukulele journey if you suffer from finger pain.
Feeling pain in your fingers when you first to practice the ukulele first does not mean your fingers are too feeble for the instrument or that it indicates your disability. Indeed, it implies you’re on the way to becoming a better ukulele player.
You can do several finger workouts daily or before your ukulele practice session to relieve finger pain and strengthen and expand your finger muscle mass.
We’ve put together five fundamental practices, warm-ups, and exercises to ready you to play this instrument. Some are expansion practices, and a few are for an excellent understanding of your instrument. So, let’s read them carefully.
5 Easy Ways of Ukulele Finger Exercises

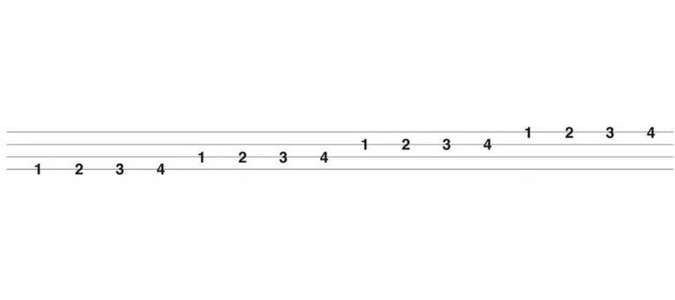
1. The 1234 ukulele finger exercise
The “1234” ukulele finger exercise is a simple fingering exercise that aids you in developing skills and coordination in the picking hand. Here’s how to do it:
- Commence by putting your thumb on the G string, your index finger on the C string, your middle finger on the E string, and your ring finger on the A string.
- Each string in succession starts with your index finger on the C string, then your middle finger on the E string, your ring finger on the A String, and finally, your thumb on the G string.
- Reiterate the pattern several times, confirming to retain a steady rhythm and consistent volume.
- If you can go with the pattern once comfortably, attempt to change the speed or experiment with different finger combinations.
You can use this exercise as a warm-up before strumming the ukulele or as a stand-alone exercise to develop finger-picking skills. You can play more complicated fingering patterns and techniques on the ukulele with just practice.
2. Playing chromatic lines, ukulele finger exercise
Chromatic line exercises will become an excellent approach to developing finger strength and efficiency, alongside improving your strumming technique. See how to accomplish it:
- Commence by placing your index finger on the 1st fret of the A string, your middle finger on the 2nd fret, your ring finger on the 3rd fret, and your pinky on the 4th fret.
- You pluck each string in succession, beginning with the A String, then the E string, the C string, and finally the G string.
- After playing all four strings, slide your pinky up a fret and repeat the pattern, playing the A string with your index finger on the 2nd fret, the E string with your middle finger on the 3rd fret, the C string, and the G string with your ring finger on the 4th fret and your pinky on the 5th fret.
- Continue this pattern up the fretboard, sliding your hand one fret at a time as long as you don’t reach the 12th fret.
- If you reach the 12th fret once, do the opposite of the pattern and move back down the fretboard, gliding your hand down one fret at a time.
- Reiterate this practice a few times to retain a steady rhythm and consistent volume.
Through practice, you’ll be capable of playing chromatic lines more effortlessly and fluently, and you’ll improve too much finger strength and efficiency on the ukulele.
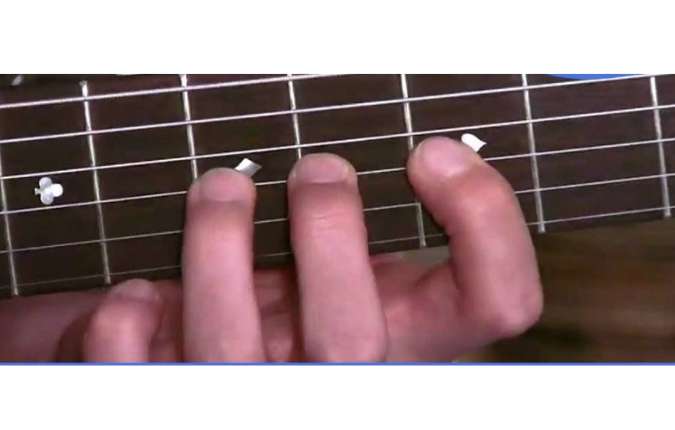
3. Finger Workouts
You’ll find three finger workouts that can aid in improving finger strength and dexterity:
Spider Move: This exercise involves putting your fingers on the frets of a single string and moving up and down the fretboard. Begin with your index finger on the 1st fret, the middle finger on the 2nd fret, the ring finger on the 3rd fret, and the pinky finger on the 4th fret.
Begin playing each note simultaneously, and afterward, take your fingers to the next set of frets (2-5, 3-6, etc.) until you can go to the 12th fret. Then, accomplish the pattern oppositely and progress your way down the fretboard.
Hammer-on and pull-off: This exercise involves playing notes on adjoining frets with hammer-on and pull-off. Commence with a Note on the 1st fret with your index finger, and afterward hammer on the 2nd fret with your middle finger.
Move from the 2nd fret back to the 1st fret, and next, start by playing the open string. Reiterate this pattern with your other fingers and continue working your way up the fretboard
Alternate picking: This exercise involves utilizing alternate picking to play a scale or series of notes. Begin with playing a Note on the 1st fret with your index finger, followed by a Note on the 2nd fret with your middle finger, a Note on the 3rd fret with your ring finger, and a note on the 4th fret with your pinky. Then, keep working your way back down the fretboard using alternate picks to play every note.
Keep practicing these finger workouts consistently and slowly increase your tempo and accuracy to raise your finger strength and efficiency on the ukulele.
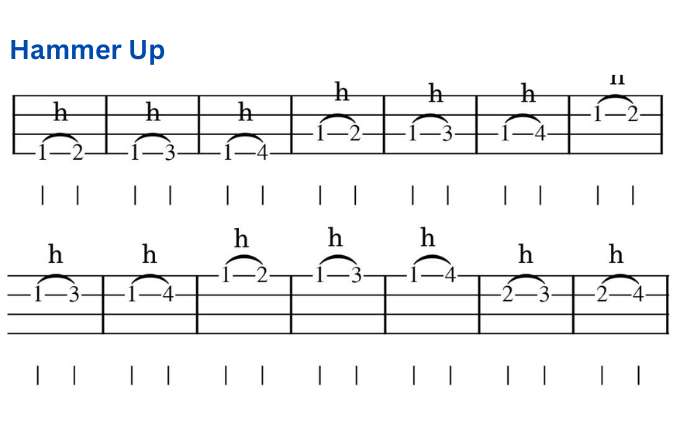
4. The Hammer Up
The Hammer-up ukulele finger exercise is a great way to improve your hammer-on technique and raise your finger strength. Look at how you can do it:
- Commence by putting your index finger on the first fret of the A string.
- Go to play the note with your index finger, and next, hammer the 3rd fret with your ring finger.
- Raise your ring finger off the fretboard and hammer the 4th fret with your pinky finger.
- Raise your pinky finger off the fretboard, and next, hammer on the 5th fret with your index finger.
- Reiterate this pattern up the fretboard, continuing your way up to the twelfth fret.
- If you arrive at the twelfth fret once, do the opposite of this pattern and continue your work to the 1st fret.
- Keep practicing this exercise gradually first, ensuring every hammer has become clear, and unwanted string sounds are not produced.
- Gradually increase your tempo because you’ll feel more comfortable with the exercise.
This exercise becomes excellent for raising your finger strength and growing the capability of playing smoothly and fastly, utilizing the hammer-on. The more you become skilled, the more you may experiment with various finger variations and combinations to challenge yourself.
5. Wrist stretch and Reverse wrist stretch ukulele finger exercises
Wrist stretch and reverse wrist stretch exercises become significant for aiding in preventing your injury and retaining your wrist and hand flexibility when playing the ukulele. Here are the methods:
Wrist Stretch:
- Stretch your arms before you with your palms down.
- Using another hand, mildly drag your fingers backward toward your wrist as long as you can feel a stretch in your wrist and arm.
- Retain the stretch for 10-15 seconds, and next, release.
- Reiterate the stretch on the other side.
Reverse Wrist Stretch:
- Stretch your arms before you and place your palms facing up.
- Using your other hand, mildly shove your fingers down toward your wrist as long as you perceive a stretch in your wrist and arm.
- Retain the stretch for 10-15 seconds, and next, release.
- Reiterate the stretch on the other side.
Especially before and after playing the ukulele, regularly doing these stretches is essential to assist in resisting injury and maintaining flexibility in your wrists and hands. Furthermore, taking regular breaks during your exercise is also necessary for giving your hands and wrists a chance to recover and rest.
<
img src=”https://ukulelesreview.com/wp-content/uploads/2023/03/Wrist-stretch-and-Reverse-wrist-stretch.jpg” alt=”Wrist stretch and Reverse wrist stretch” width=”675″ height=”430″ />
Conclusion: Ukulele Finger Exercises
Finally, we’ve attempted to present a few fundamental ukulele finger exercises in this brief and beautiful guide. We believe if you continue the basic finger-expanding exercises for both the right and left hand, exercise major and minor scales, and strum hand exercises, you’re on the right track.
Chord shapes will become simple. Also, finger extension will become fantastic if you have troubles like carpal tunnel syndrome (CTS), and your ukulele playing will be okay.
Reiterate these five exercises and patterns and warm up your fretting arm and the other arm, getting your muscles ready for some work.
Read also: